
Master the Smokey Eye: 2026 Professional Makeup Tutorial
What if the secret to a perfect smokey eye isn’t actually your eyeshadow palette? Many people spend years trying to replicate celebrity looks, only to end up with dark fallout ruining their foundation or colors that blend into a muddy mess. If you’ve ever felt like your eye makeup looks more like a bruise than a professional masterpiece, you aren’t alone. It’s a common hurdle that even the most dedicated beauty enthusiasts face when they lack a clear, technical roadmap.
In this smokey eye makeup tutorial lesson, we’ll peel back the curtain on the professional secrets that transform a standard routine into a high-end result. You’ll discover how the right skin preparation, such as starting with a custom facial, creates a smooth canvas that helps your makeup last longer and look more vibrant. We’ll also show you how a personalized approach can help you master your own tools and select shades that truly compliment your unique skin tone. From preventing fallout to achieving a seamless blend, this guide provides the professional foundation you need for a flawless, confident finish every time.
Key Takeaways
- Learn why professional skincare is the essential “step zero” for ensuring your eye makeup stays vibrant and smooth all day.
- Follow a structured smokey eye makeup tutorial lesson that covers everything from laying transition shades to mastering the “outer V” technique.
- Understand the critical difference between eyelid primers and concealer bases to prevent creasing and muddy colors.
- Discover how personalized instruction addresses unique features like hooded or deep-set eyes that generic online videos often overlook.
- Gain the confidence to use your own makeup tools effectively, achieving a clean and professional finish every time you get ready.
Preparing Your Canvas: The Foundation of a Perfect Smokey Eye
Professional makeup artistry isn’t just about the colors you choose. It’s about the preparation. If you skip the groundwork, your eyeshadow will likely crease or fade before the evening even begins. This is why we treat skincare as the essential “step zero” of any professional eye look. A smooth, hydrated surface allows pigments to show their true intensity and blend without resistance.
Skin Prep for Long-Lasting Eye Makeup
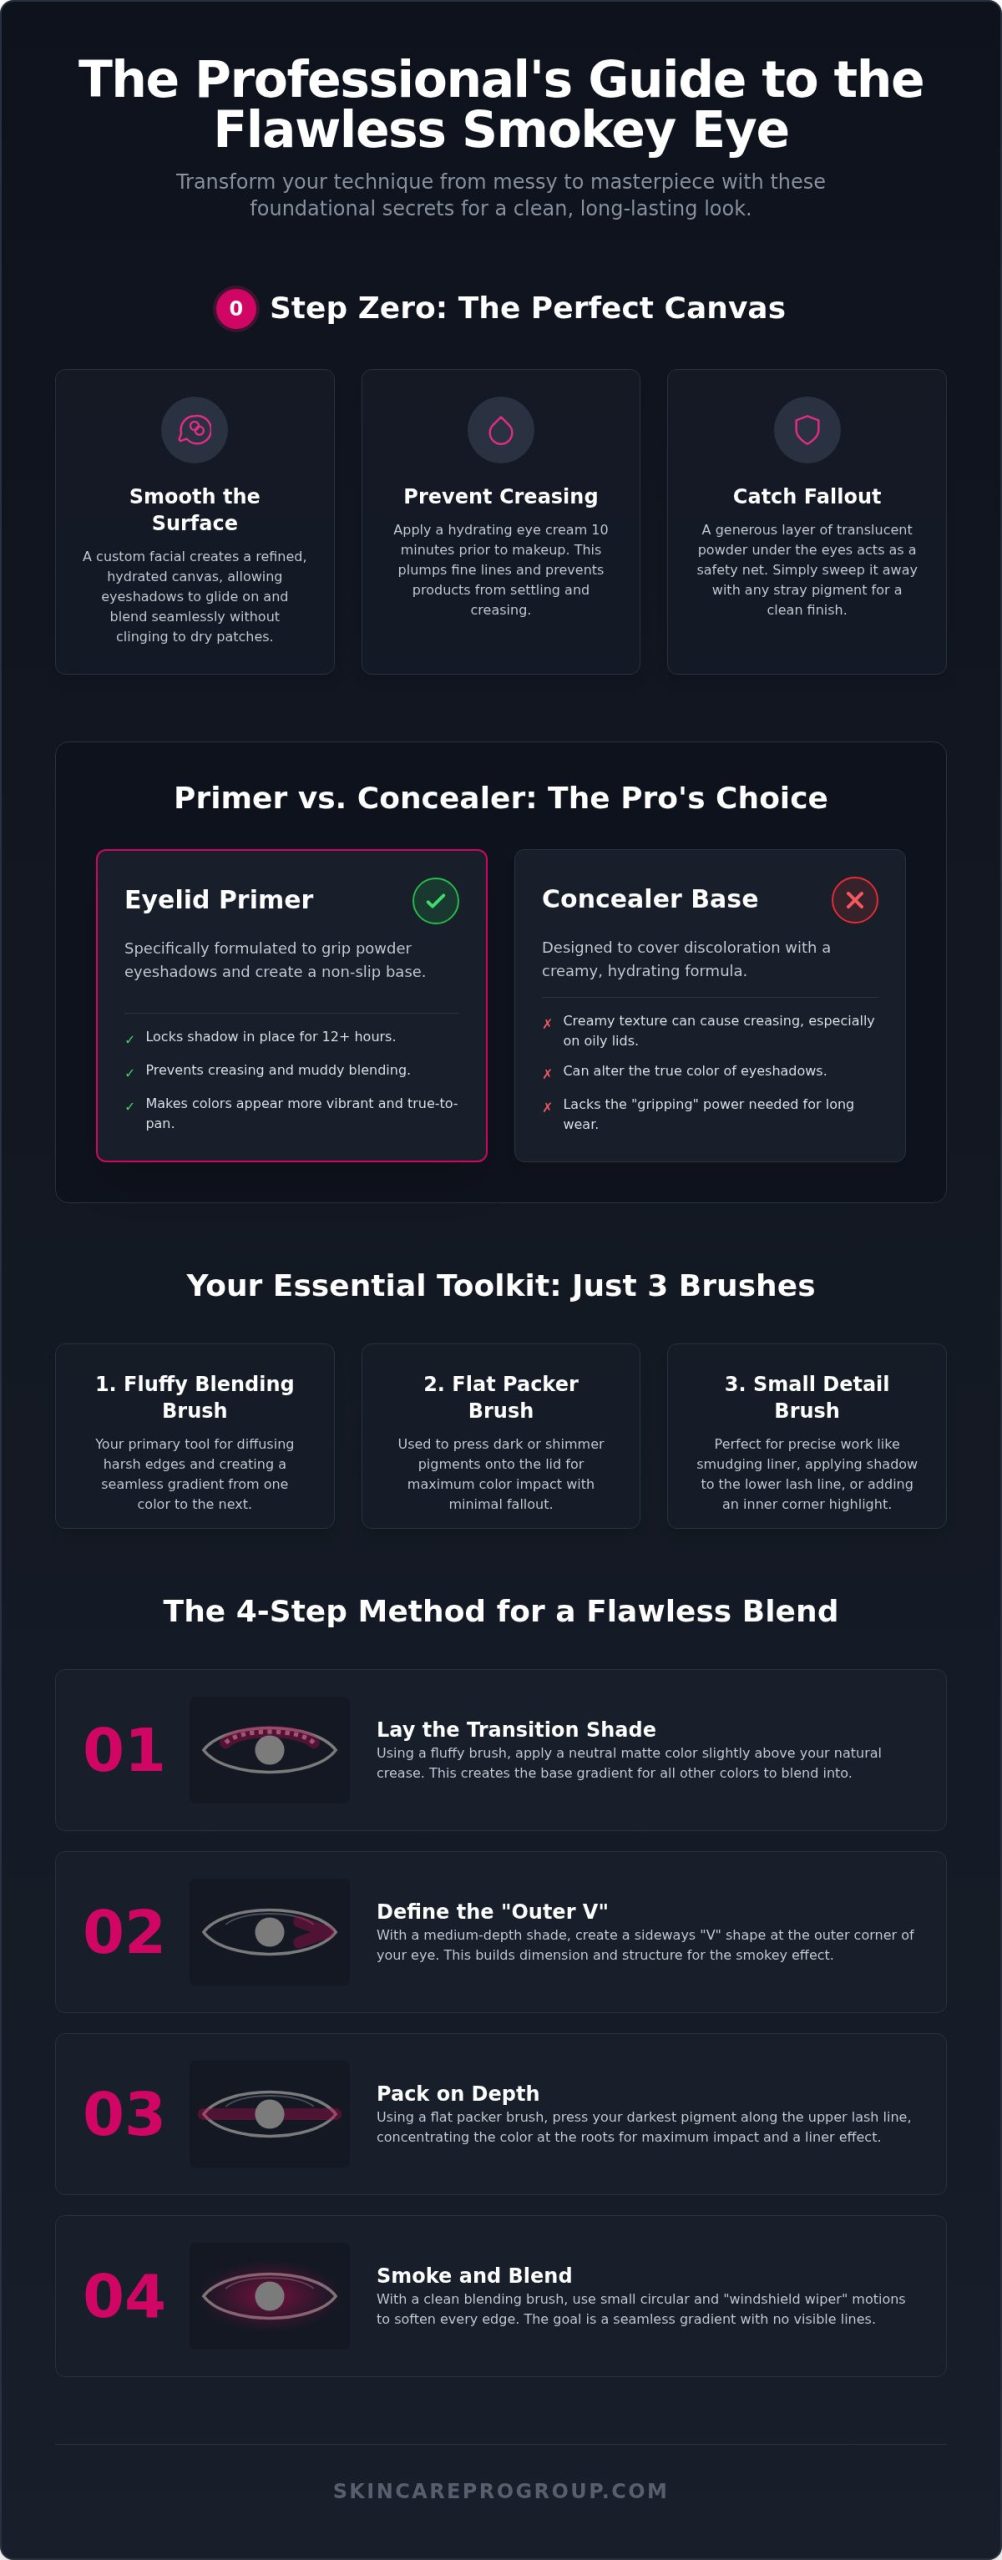
Think of your skin as a canvas. A Custom Facial creates the smooth, refined texture required for seamless blending. When the skin is properly exfoliated and hydrated, shadows glide on instead of sticking to dry patches. To prevent eyeshadow from settling into fine lines, use a lightweight, hydrating eye cream at least ten minutes before starting. This gives the product time to absorb so it doesn’t interfere with your primer. For fallout, applying a generous layer of translucent powder under the eyes acts as a safety net. This allows you to sweep away stray pigments later without ruining your foundation.
Professional artists often debate between using an eyelid primer or a concealer base. While concealer helps even out skin tone, it’s designed to be creamy. This can lead to creasing, especially on oily lids. A dedicated eyelid primer is formulated specifically to grip powder and lock it in place for twelve hours or more. Understanding these technical differences is a core part of any comprehensive smokey eye makeup tutorial lesson.
Essential Tools and Palette Selection
You don’t need dozens of brushes to succeed in this smokey eye makeup tutorial lesson. You only need three high-quality tools to achieve a professional result:
- Fluffy Blending Brush: This is your most important asset for diffusing edges so colors don’t look “stuck” in one place.
- Flat Packer Brush: Use this to press dark pigments onto the eyelid for maximum color impact and minimal mess.
- Small Detail Brush: Perfect for smudging liner and adding depth to the lower lash line with precision.
When choosing colors, look at your natural undertones. If your veins appear blue, cool-toned greys and plums will look most sophisticated. If they appear green, warm bronzes and rich browns are your best bet. Always start with matte transition shades to build the structure of the eye. Save the shimmers for the very end to add a touch of light to the center of the lid, which helps the eye look open and awake rather than heavy.
Step-by-Step Tutorial: Crafting the Classic Smokey Eye
A professional smokey eye relies on a specific sequence of layers rather than a single, heavy application. In this smokey eye makeup tutorial lesson, we prioritize control and technical precision. By building the look in stages, you ensure the final result is sophisticated rather than messy. This methodical approach is what separates a high-end application from a rushed effort. It gives you the flexibility to adjust the intensity as you go, ensuring the final look matches your personal style.
We begin with Step 1: the transition shade. This neutral color acts as a bridge between your darkest shadow and your natural skin tone. Apply it just above your crease using a fluffy brush to create a soft, diffused base. Next, Step 2 involves the “outer V” technique. By placing a medium-depth shade at the outer corner of the eye in a sideways “V” shape, you create a structural frame that adds immediate dimension. Step 3 brings the drama. Press your darkest pigment along the upper lash line, keeping it concentrated near the roots for maximum impact. Finally, Step 4 is the signature “smoke out.” Use a clean brush to soften the edges, ensuring every color melts into the next without visible lines.
The Layering Technique: Base, Transition, and Depth
Building color slowly is significantly easier than trying to fix a heavy-handed application. Start with a light touch. It’s much simpler to add more pigment than it is to remove excess shadow that’s already bonded to your primer. When applying these products, remember to follow cosmetic safety guidelines to ensure you’re protecting the delicate tissues of your eyes. Using a neutral bridge color helps connect the dark lid to the brow bone, creating that iconic gradient that professionals strive for.
Blending Secrets: Avoiding the ‘Muddy’ Look
The secret to a clean look lies in the motion of your brush. Use a “windshield wiper” motion to distribute color across the crease, but switch to small, circular strokes to diffuse the edges. You’ll know it’s time to stop blending when the transition looks seamless but you can still see the distinct depth of the different shades. Precise crease placement is the definitive key to creating eye-opening effects that lift and define your natural features. If you find yourself struggling with these technical movements, you might benefit from a personalized makeup lesson to refine your technique and master your own tools.
Beyond the Tutorial: Why a Professional Makeup Lesson Changes Everything
Digital tutorials offer a great starting point, but they often fail to account for the unique architecture of your face. A generic video might suggest placing shadow in a way that completely disappears on hooded eyes or makes deep-set eyes look smaller. This is why a personalized smokey eye makeup tutorial lesson is so transformative. A professional artist doesn’t just show you a look; they analyze your features to find the specific angles and placements that enhance your natural beauty. This tailored approach ensures you aren’t just copying a trend, but rather mastering a technique that works for you.
Transitioning your look from a daytime soft smoke to a high-drama evening style is another skill best learned through direct instruction. By understanding how to layer darker pigments over your existing base without creating texture issues, you gain the flexibility to adapt your makeup for any occasion. It’s about building a toolkit of skills that you can rely on for years to come, rather than just memorizing a single sequence from a screen.
Personalization for Your Unique Eye Shape
For those with hooded eyes, the secret is applying color slightly above the actual crease so the pigment remains visible when your eyes are open. If you have almond or round eyes, the goal shifts toward enhancing symmetry and length. We focus on techniques that lift the outer corners, creating a balanced and polished appearance. Whether you’re aiming for a subtle daytime effect or a bold night look, understanding these subtle adjustments ensures your makeup always looks intentional and professional.
Booking Your Professional Session in Frederick, MD
Mastering these skills happens best in a hands-on environment. During a One-on-One Makeup Lesson at our Frederick studio, you’ll receive direct feedback and guidance. We encourage you to bring your own makeup bag. This allows us to see what you’re already using and show you how to maximize your current tools. If you’re preparing for a major event, many clients choose to combine their learning session with a Bridal Makeup Application or special event prep. It’s a strategic investment in your personal brand and confidence. Ready to master your look? Schedule your appointment online today to start your professional beauty journey.
Elevate Your Beauty Standards with Professional Expertise
Achieving a flawless smokey eye is a journey that begins with a refined skincare foundation and ends with a mastery of technical blending. By prioritizing skin health and following a logical layering sequence, you can avoid the common pitfalls of muddy colors and foundation fallout. This smokey eye makeup tutorial lesson has outlined the essential roadmap, but the most significant growth happens when these techniques are adapted to your individual features.
Expert guidance from our lead esthetician, Jennifer, allows you to move past the limitations of one-size-fits-all tutorials. At our studio conveniently located in Frederick, MD, we provide a supportive environment where every lesson is customized for your specific eye shape and skin type. This personalized approach ensures that you don’t just learn a look, but you master the tools and products that work best for you. We’re here to act as your strategic partner in developing a professional beauty routine that reflects your ambition and style.
Ready to take the next step? Book Your One-on-One Makeup Lesson in Frederick to receive the dedicated mentorship your routine deserves. We can’t wait to help you reveal your most confident self.
Frequently Asked Questions
How do I stop my smokey eye from looking like a black eye?
The key to avoiding a bruised appearance is controlled placement and thorough blending. Focus your darkest pigments right against the lash line and use a lighter transition shade to diffuse the edges toward the brow bone. Keeping the inner corners of your eyes bright and avoiding heavy application too far below the lower lashes will ensure the look remains polished and intentional.
What are the best eyeshadow colors for brown eyes versus blue eyes?
Brown eyes are versatile and look best with rich purples, deep golds, or navy blues that highlight their natural warmth. If you have blue eyes, warm earth tones like copper, bronze, and peach provide a complementary contrast that makes the blue appear more vibrant. Choosing the right palette is a technical skill we cover in every smokey eye makeup tutorial lesson to ensure the results match your unique features.
How long does a professional makeup lesson usually take?
A typical one-on-one session usually lasts between 60 and 90 minutes. This duration allows enough time for a professional artist to analyze your features, demonstrate specific techniques, and let you practice with your own tools. It’s a focused educational experience designed to provide long-term value and confidence in your daily beauty routine.
Can I do a smokey eye if I have hooded eyelids?
You can definitely wear a smokey eye with hooded lids by adjusting where you place your crease colors. Applying shadow slightly higher than your natural fold ensures the colors stay visible when your eyes are open. This technique creates the illusion of more lid space and prevents the makeup from looking hidden or heavy, resulting in a lifted and defined appearance.